I finally had time to put a card together for the Busy Bee Bloggers 1st challenge. The challenge was to add some pop to your card. I added some pop dots under the image and under the flowers and buttons to give it a little dimension. I realize the color combination is a little funky but that is because I actually used the card as a three in one challenge. The color combination is for the August Wish RAK card challenge at SCS and the card sketch is from the Sugar Bowl. This cute image is called Sweet N Sassy and is another Sugar Nellie stamp.
Thanks for stopping by.
P.S. Time is quickly running out to win this month's blog candy. Be sure to post a comment under that post for your chance to win.
I found my Cuddly Buddly stamps when I was cleaning the craft room his week - just in time to make this adorable baby shower card. The scalloped circle is cut out of Stampin Up chocolate chip paper with my Cricut. The sketch is from the MOJO98 sketch challenge a few weeks ago. I added some double stitched ribbon and a few hand dyed dew drops to finish it off. (My pictures are better with the new light box, but they still need a little work. )
I just finished a photography class at the local community college and have been spending the last few weeks experimenting with the photography of my cards. My main problem seems to be lighting -- or lack thereof. I have been shooting pictures on the dining room table near the window with the light on or on the couch with the window and front door open and just could not seem to get it right. I have been eyeing some light tents and lighting but just haven't been able to pull the trigger. But I think I may have finally found the solution - I built my own light box.
I have seen that some people on the web have created their own light tents at home using wood and in some cases plastic tubing. I finally stumbled across some instructions that I thought I could follow at eyefetch.com. So after a quick trip to the hardware store and a few instructions from my better half on how to use the pipe cutter I was able to knock one out in less than 30 minutes.
Here is what you need:
2 - 10 ft lengths of PVC pipe
4 - 90 degree bend connectors
4 - 90 tee connectors
1 twin size white sheet
1 piece of poster board
hole punch
pvc cutter
3 sheet metal screws
2 50 watt desk lamps (I used two reflector lights from the tool section instead - $7 each)
Cut the first length of pipe into 4 individual 17" pieces, 4 individual 2" pieces, and one 20" piece. Cut the remaining pipe into one 20" piece and 2 individual 24" pieces. Assemble each 17" section to a 90 degree bend connector. Then insert a 2" piece of pipe and add a tee connector to the end. Repeat three more times until you have four legs.
Next, insert a 24" piece between the two tee connectors to form your front and back. Then insert the 20" pieces into the tee to form the two sides. (I hope that makes sense.) Finally punch three holes along the top of your poster board. Hold the poster board up to one of the 24" pieces and mark where to insert your screws. The posterboard will hang off the screws so don't screw them in all the way. That is pretty much it.
Cover the box with the sheet and place one lamp on each side and you are ready to photograph your cards. You can even use some 20w halogen lamps for fill lighting if need be. I will be back with some new pictures later.
Thanks for visiting -
After the great luck I had last week winning blog candy at the Sugar Bowl, I decided to give a few more challenges a try. Magnolia stamps are among my favorite stamps and I am an admirer of the Just Magnolia challenge blog. That design team has some impressive cards. The theme for the Week 18 challenge is friendship. Basically anything that you would give to a friend qualifies to enter. The prize is a Basic Grey Sultry collection pack from The Hobby House. I used this Cherry Tilda that I got from Amy over at Splitcoast Stampers. I have had this cherry paper in my stash for a while trying to think of a way to use it. The sketch is modified from a sketch a found at SCS. I tried to distress the edges of the blue cardstock by rubbing my scissors on it but it didn’t work out quite as I had expected. Next I resorted to some white chalk and paper piercing. The images is colored with prismacolor pencils and gamasol. (I’m trying to decide if I want to move on to copic markers or not??) Let me know what you think.
Well ladies I had quite a surprise today. I hopped on over to the Sugar Bowl to see what this week's sketch challenge was and saw my name listed as the Challenge 16 winner. I could not believe my eyes. Then I thought I had better click on the link to make sure it was me because there was more than one Jane listed in the entries. Sure enough it was! I am so excited. So for being the winner I get to pick six stamps from the Sugar Nellie line. I am off to make another card for the Sugar Bowl and to pick out my new stamps. If you get a chance stop by Funky Kits and see all the great Sugar Nellie stamps.
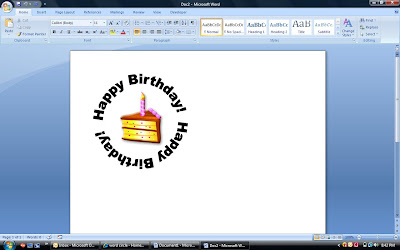
Have you ever wondered how people get those words in a circle shape around their stamped image? Well here is a quick tutorial using Microsoft Word. I inserted a piece of clip art in the center of mine but you would print the word circle and stamp your image in the center then cut with a circle cutter or punch. Or for you digital stamps you could insert that in the center.
To make words into semi-circles, circular, etc that you can print off and put on your card or print directly onto your paper, do the following:
1. Open a Word Document
2. Select Insert, then "picture", then "WordArt".
3. Word should open a menu to choose different "styles".
4. Select a 'style' and click ok.
5. Type the text you wish to view and click ok.
6. Word will then display the style and the words into the format chosen.
7. You can then drag and drop the text anywhere on your paper.
8. Left click on the words and a diagram box should appear around the words along with a text editor. In the middle of this text editor is an "A" - WordArt Shape. Select that and you will get more options.
9. To get a circle of the words that you typed.. click the circle.
10. Word will automatically take the words and loop them in a circle.
11. You should see some little black boxes in the corners and in the middle of the line around the words. If you take your mouse and put it over those boxes, you should get a directional arrow. Left click and hold your mouse down... dragging the arrow down the page to make the text box larger.
12. Play with this and have fun.
Thanks for stopping by!
Here are two more of my favorite flowers to crochet for cards. You can use crochet thread of even DMC floss to mix and match with your favorite papers. Pop a brad or a button in the center for a little extra touch. They are very inexpensive and you can make several just waiting at the kid's sports practice or while watching a TV show.
Flower at top left:
Rnd 1: Ch 2, 5 sc in 2nd ch from hook. Join with sl st to first sc.
Rnd 2: [ (ch 2, 3dc, ch 2, sl st) in the same sc, sl st to the next sc], 5 times, making 5 petals. Cut off.
Orange flower:
(This flower is from Nichole Heady's blog. she has some wonderful picture tutorials for this flower if you need a little help)
Step 1: ch 5. Join with sl st to form ring.
Step 2: Add 10 sc through ring.
Step 3: sl st to top of first sc.
Step 4: create a small petal in the first sc using the following pattern (sc, 3dc, sc).
Step 5: continue creating a small petal in every other sc with the same pattern (creating 5 petals total). sl st to join with first sc of first petal. You can stop here and fasten off for a small flower that measures approximately 1-inch in diameter. Or you can continue to create a more elaborate 2-layer flower.
Step 6: flipping to the back of the flower, sc down through base opening of small petal.
Step 7: ch 3, and sc through next petal base opening.
Step 8: repeat 4 more times in each opening. sl st through first sc, creating a series of 5 loops total.
Step 9: create a large petal in the first loop using the following pattern (sc, 5dc, sc).
Step 10: continue creating a large petal in each of the remaining 4 loops with the same pattern. sl st to join with first sc of first petal.
Thanks for stopping by!
Isn't this little girl adorable! The stamp is called "Giddy Up" and is a line from Sugar Nellie. I love to look at all the design team cards over at the Sugar Bowl challenge blog and decided to give this week's sketch a shot. I inked the edges of all my papers with some Chestnut ink to give it a more aged look. The brads are a little crooked at the bottom - but that's what happens when I get in a hurry. Anyways hop on over to the Sugar Bowl and check out all the great cards. This week's prize is a Sugar Nellie 6 stamp pick'n'mix.
I have been working on some crocheted flowers lately. I played with several different patterns and have narrowed it down to my five favorite. Some of these are from other people and some I have adapted to what I was looking for. Here are the first two:
General information
Materials:
yarn or cotton thread
crochet hook
scissors
Abbreviations:
Ch=chain
Sl st=slip stitch
Sc=single crochet
Hdc=half double crochet
Dc=double crochet
Rep=repeat
Rnd=round
Rnd=round
Purple flower:
Ch 4, join with sl st to form ring
Rnd 1: Ch 2, 9 dc into ring, join with sl st to Ch 2
Rnd 2: Ch 3, skip first sc from hook, sc into next sc. Repeat four more times joining with sl st to first loop of first Ch3.
Rnd 3: sc, 4 dc, sc into first chain 3 loop. Repeat four more times ending with sl st to first single crochet.
Fasten off and weave ends into flower with small hook or needle.
Green flower:
*Note: I found this pattern on the internet but now I can not find it. If you know where please let me know so I can make sure they receive credit.
Ch 4, join with sl st to form ring
Rnd 1: Ch 1 sc in ring * ch 3 sc in ring *, repeat * to * 3 more times, ch 3, sl st to first sc
Rnd 2: (sc, Ch 1, 3 dc, sc) in same ch 3 space around in each ch 3 space. sl st to first sc
Fasten off and weave ends in with hook or needle.
I finally got a few minutes to make another card. I have been a little challenged due to what I like to call a "creative mess." My other half says he doesn't know how I can even make anything because things are so strung about. I just organized this room six months ago with some storage cubes and a bookcase from IKEA only to later realize I am not a sit down crafter. I would much prefer to stand at the dining room table -- or even better -- the kitchen counter. Guess it's time to rethink the craft room situation.
Anyways I was able to dig up enough stuff to put this card together tonight. I used the sketch over at the Mojo Monday challenge blog. I have been dying to ink up some of my new stamps from Sugar Nellie's Gorjuss Girl Set #3. I love this cute little Party Princess stamp and thought these papers would go perfect. I am still working on my knot and bow tying. Thank heaven's for YouTube!
Digital images are a great alternative to rubber stamps. You simply download them and store them on your computer hard drive. No extra equipment is required. Printing them is as simple as opening Microsoft Word and inserting the picture which can be resized to the size you want (even better than rubber stamps!) Run a piece of your best cardstock through the printer and you have your image - no need to worry about imperfections in your stamping. You can trim these images with your paper trimmer or Nestabilities.
One of my favorite places to get digital images is from Mo's Digital Stamps. I'm sure you will find something great there. The owner, Maurie Manning is a children's book author and illustrator and has decided to jump into the world of digital images. She had so many cute items it was hard to choose. I received my images within 5 minutes of placing my order. Head on over and check it out!
Today I bring you this hand crocheted butterfly pattern courtesy of Margaret Hubert. I used No. 10 crochet thread with a 1.5 mm hook.
BUTTERFLY: "Chain 15, join with a slip st to the first ch (forming a large loop) Chain 15, join with a slip st in the same st as you joined the first loop, you now have 2 loops , chain 10, join with a slip st in the same st as other loops are joined, chain 10, join in the same st again. You now have 2 chain 15 loops and 2 chain 10 loops.
Work as follows: working over the chain of the first chain 15 loop *work 5 sc, chain 4, 1 sc, ch 6, 1 sc, ch 8, 1 sc, ch 10, 1 sc, ch 8, 1 sc, ch 6, 1 sc, ch 4, 5 sc. Working in 2nd ch 15 loop, repeat from * once. Now working over the ch of the next ch 10 loop *Work 2 sc, ch 4, 1 sc, ch 6, 1 sc ch 8, 1 sc, ch6, 1 sc ch 4, 2 sc, repeat from * in the 2nd chain 10 loop. Join slip to beg ch, end off, leaving a 6” length of yarn, wrap this around center to form body of butterfly, tie a knot underneath body."
You can dress these with pearls or even try dying them with some Stampin' Up ink to match your color scheme. Thanks for stopping by!
Well ladies - the BasicGrey Challenge blog is back up and running with a whole new look. They don't have the new challenge listed yet, but they have some fabulous blog candy up for grabs. Skip on over and take a look at this bunch of goodies. Their blog candy ends on Friday the 21st of August at 10 p.m. UK time. The blog candy is open worldwide so everyone is welcome.
I was doing some blog hopping yesterday and came across another weekly challenge. There are more challenges out there than I realized. It is hard to choose which ones to participate in but since I am a beginner so I try to stick to the easy ones. I found this sketch challenge over at Create4Fun that really pushed by limits. This long type of card is not something I am familar with. I wish they would give some dimensions for us newbies to use. After staring at the sketch for 30 minutes and looking at all the gorgeous cards by the design team members I decided to give it a try. I used some scraps from that same Daisy D pack of papers I used the other day along with some Stampin' Up cardstock. I needed five coordinating papers so that made it a little easier. I inked up this Just a Girl stamp from Sugar Nellie's new Gorjuss Girl line and colored her with prismacolor pencils. I added this hand crocheted butterfly, a few pearls, some pink organza ribbon and this cute little "Made With Love" charm. After a few hours I finally finished it.
Thanks for stopping by. Check back later this week as I am going to start giving away some blog candy. As part of my blog theme "All Stamped Up and No Place To Go" I will periodically be giving away sets of stamped images.
This post will remain on top until August 31st. Scroll down to see my latest creations and current posts.
**Open until 9pm August 31, 2009**
As a celebration to the end of summer break and to help launch the theme of my new blog I am offering these great stamped images that are all stamped up and have no place to go. First of all I want to say a big Thank You to everyone who has visited, followed, or just stopped by to say hello and left a comment.
Now for the details:
You can enter as many times as you like, I just ask two things – 1) that you be a follower of this blog “or” leave a link on your blog to me – and 2) leave me a message on this post to say you have done it – simple right?
The winner will be picked at random on the night the candy closes and I will email the winner for their mailing information the following day. For my first round of stamped image giveaways I am offering one of each of the Gorjuss Girl line from Sugar Nellie. They are (in no particular order):
A Little Birdie Told Me
Bear Hug
Bumble Bee
Flower Girl
Foxy
Guardian Angel
Just A Girl
Little Ducky
Little Goth Girl
Little Miss Attitude
Little Star
Party Princess
Poppy Fields
Purrfect Friend
Sent with Love
Sitting
Up Up and Away
All images are stamped on Neenah Solar White Paper using Memento Tuxedo black ink.
To see all the fabulous stamps from Sugar Nellie visit Funky Kits.
Subscribe to:
Posts (Atom)